
During the preparation to import data, we often find ourselves having to fill a lot of values that are often the default values. For example, language, currency, customer group or group of suppliers etc....
In this article i will show you how we can assign default values during the importing process through DIXF.
The following example illustrate how to automatically assign default values for vendor currency and vendor group during the importing process. However we can use the same approach to assign default values for any other fields.
Note: This example assume that you know how to set up the DIXF Parameters, Source file and Processing Group, So if you don't know how to configure any of these please read any of my previous articles about the DIXF.
To automatically assign default values do the following :
1- I will use the same CSV file that we created when we discussed how to import vendors master data. The CSV file contain the VendorGroup (Vendor Group), Currency (Vendor Currency).

2- Delete the VendorGroup and Currency since we are going to assign the values of these this filed automatically.

3- This is how the CSV file looks after we delete the currency and the vendor group . Save and close the SCV.

4- Go to the DIXF > Processing Group > Select the vendor processing group then click the entities button.

5- In the entities form make sure that the vendor entitiy is selected, and SCV file path is correct then click generate source mapping.

6- Then click the modify source mapping button

5- In the entities form make sure that the vendor entitiy is selected, and SCV file path is correct then click generate source mapping.

6- Then click the modify source mapping button

7- Click Mapping Details button.

8- Click New to create new record, then make sure to select the Auto default check box ( This is the trick), go to the staging field and select the Currency field.

9- Then click Default value button > select the click Currency.

10- Repeat 8 and 9 steps to select the default value for the vendor group. when you finish. close the form to go back to the entities form.

11- Click preview source file button to see the data. note that Currency and vendor group values was generated automatically. Close the form.
Note: don't click the validate button, if you did the default values will be cleared.

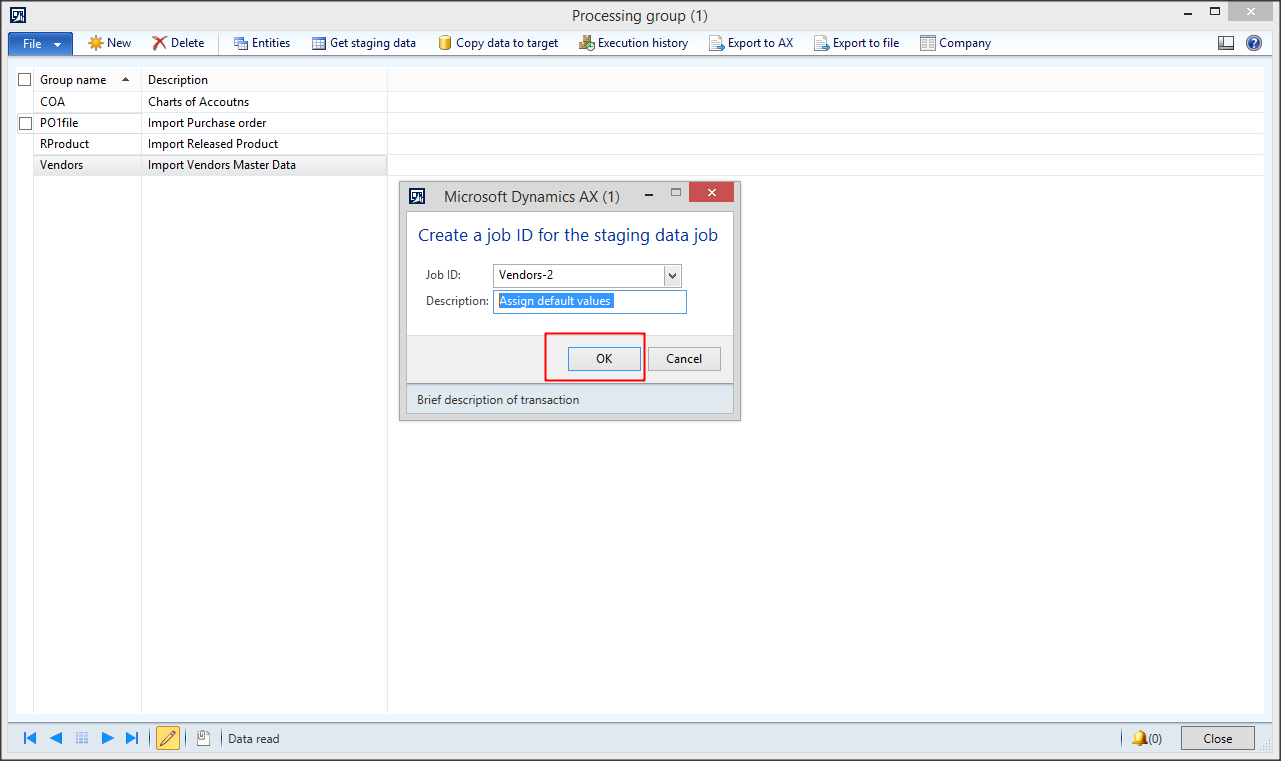
12- Go back to the DIXF > processing group > Select the vendor group then click Get staging data button.

13- Click Ok to create job
14- Click Run in the staging data execution form.

15- Click Ok.

16- The records will be inserted in the staging. close the infolog.

17- Next, In the processing group select the group name then click Copy Data to target button.

18- Select the Job ID that we created in step 13 then click OK

19- Click run to import

20- Click Ok.

21- The data will be written to target

22- Go to the Vendor List form, note that currency, and vendor groups was assigned successfully.

See also
 |  |
 |  |
 |  |
 |  |
 |  |
 | |
Good reead
ReplyDelete