Purpose: The purpose of this article is to illustrate how to configure and use the change based alerts functionality in MS Dynamics Axapta 2012
Scenario: In this article we are going to send alert to specific user if the value in the "Report as ready" field has been changed in General Journal Voucher. To do that we need to do the following :
First : Configure the Server configuration
- Go to System administration --> Setup --> System --> Server configuration.

- Make sure that one of AOS in selected as batch server. if there is no AOS was defined as batch server.

- Close the form
second: Configure the Batch group
- Go to System administration --> Setup --> Batch group.

- Click the New button to create a new record in the Batch group form by entering proper name and description.

- Switch to the Batch servers tab on the Batch group form then from the right side select the Batch server how is responsible to run this batch group and moving it to the left side.

- Close the form
third: Configure Change based alerts- Go to System administration --> Periodic --> Alerts --> Change based alerts.

- in the change based alert form select the "Batch Processing" check box.

- From the "Batch Group" dropdown list select the batch group that we create early.

- Click the "Recurrence" Button.

- From the recurrence form select "No end Date" radio button then from the "Recurring pattern" select "Minutes" Radio Button then write "1" in the "Count" Field.

- click close button to go back to the "Change based alerts" form.
- Click the "Alerts" Button.

- From the Alerts form unchecked "Ended", "Error" and "Canceled" Check boxes to prevent popup each time the batch is ended, Canceled or have an error. you can leave them checked if your business required that kind of alert.

- click close button to go back to the "Change based alerts" form.
- in the "Change based alerts" form click "OK" Button to create the Batch Job.

- Click Close to close the Massage Box.

Go to General ledger --> Journals --> General journal

- Switch to the History tab on the General journal form.

- Click Right click and select Create alert rule.

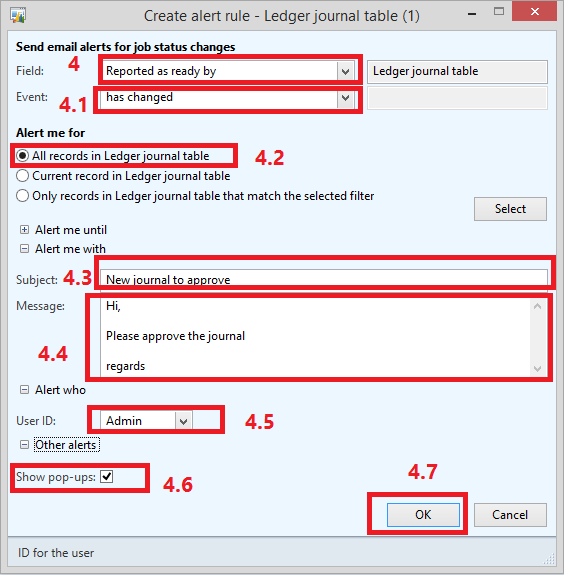
- From the Create alert rule do the following:
- select "Report as ready by" from the dropdown list.
- select "Has Changed" from the Event dropdown list.
- Select All record in Ledger Journal Table Radio Button.
- Write the Message Subject
- Write the Message Body
- Select the user who will receive the alert from the User Id dropdown list.
- Select to show the alert as pop-ups from the "Show pop-ups" check box
- Click "Ok" Button to close the form.
- Close the Manage alert rules form.
fifth: Setup notification options for user
- Go to file menu -->Tools-->Options-->Notifications.

- Change the Receive notification every (Minutes) field and change the the value to "1"

Sixth: Create New JournalGo to General Ledger --> Journals --> General Journal.

- Click the Approval --> "Report as ready" then close the form. if Approval Menu dose note exist I your form do the following:
- Go to General Ledger --> Setup --> Journal --> Journal Name
- Select the Journal Name that you will use with alert
- Click Active Check Box
- Select the User Group form the Dropdown list
- Close the form
- go back to the to the general journal form
- the Approval Menu should be exisit.

4. Wait for one minute and the pop-up will appear in the screen corner.

5. Click on the pop-up and the notification screen will open. check the details then Press "Go to origin" to open the Journal that Couse this alert . See you Next time :) bye
To get new posts and updates, please follow the blog by clicking the Join this site Button in the top-right side under my personal information
- Make sure that one of AOS in selected as batch server. if there is no AOS was defined as batch server.
Very good !!!
ReplyDeleteExcellent ilustration !!!
ReplyDeleteVery Thanks
ReplyDelete